We teach willow basket weaving at MYOWN2HANDS.CO because it’s incredibly rewarding to learn, it uses natural and sustainable materials and it’s easy and affordable to do at home.
But beyond that (like many of the adult craft kits we offer) it was a core useful skill for early humans - something we’ve done for most of our time on earth and only recently forgotten. When you make your first basket you will recognise the significance to of this. Weaving feels natural - almost familiar - and it soothes the mind. Basket weaving has long been a communal activity and it’s still a fantastic thing to do with a group today. Scientists have even discovered that it produces oxytocin in the brain, the so-called ‘cuddle hormone’ that brings out feelings of empathy, bonding and trust. Many of our customers order four or five basket kits from us and then get together for a lovely afternoon of making and learning from home, without the need to travel or find a course that fits in with everyone’s schedule.
Where did basket weaving originate?
Weaving is thought to be one of the oldest and most widespread crafts, existing in almost all human cultures. The earliest examples of baskets can be found in the Middle East and date back 12,000 years, but the craft is thought to be much older than that. Few ancient baskets survive because they were made from organic materials. In in the UK and northern Europe, nature provides the perfect natural material for basketry in the form of willow rods. These long straight shoots appear when willow is planted and coppiced in a certain way (see out blog on how to grow willow) Our willow is sustainably grown and even captures a bit of carbon from the atmosphere along the way.
How can you get started with weaving?
The first thing you will need is a bundle or two of willow. In the UK, most willow is grown in Somerset and it is sold in bunches that are sorted by weight and length. For example you could buy a 5kg bundle of willow rods that are 5ft long. Or a 2 kg bundle of willow rods that are 6ft long. Most rods used in willow basketry are either five or six feet long. There are also several types of willow you can use.

‘Brown’ willow is willow with the bark still on. Different species have different colour barks and this can be a great way to create baskets with a variety of hues.

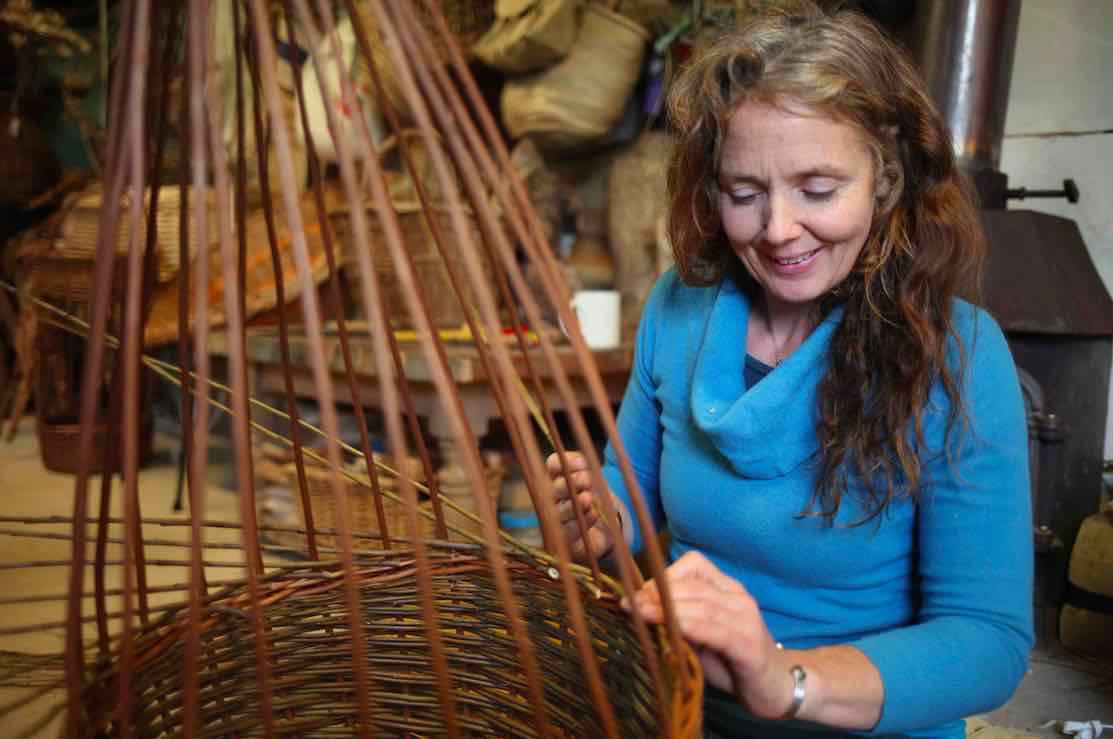
‘Buff’ willow is the toffee coloured willow that you see on a lot of classic baskets or picnic hampers. This is willow that has gone through a process where it is boiled and had the bark stripped off, which gives it it’s light brown colour.
Each basket you make requires a certain number of rods of each length. One of the nice things about our basket weaving kits is that we will send you the right amount of each length (plus a bit extra) so that you can just get on with the project.
Preparing willow for weaving.
Before you can weave it, willow needs to be soaked, so that the rods can bend without snapping. This is an easy process and totally doable at home. When you are starting out, we recommend using buff willow as it only takes 2 hours to soak and gives your basket a lovely classic look. You can soak your willow in the bath, just weigh it down with a couple of weights to keep it submerged.

If you don’t have a bath, you can use a soaking bag (we supply these with our kits). These are basically a long plastic tube that you can put the willow bundle inside. Lie it flat on the ground and then it fill up with water from a jug or hose. We recommend that you do this outside.
Once you’ve soaked the willow for a couple of hours, take a rod and bend it to see if it snaps. If it will bend without snapping, it’s ready to weave!
To get the best results you can also ‘mellow’ the willow overnight. After soaking it, drain your bath, take an old bedsheet and soak it with water, then wrap your bundle in the sheet and leave it overnight. This will allow the moisture to penetrate deeper into the rods.
Tools
The lovely thing about weaving is that you can do it with very few tools, and this is especially true with the type of smaller projects you will be doing as a beginner. All our projects are design to be done with tools you will already have lying around the house.

The main tools you will need are;
- A pair of garden secateurs.
- A bodkin – this is a metal spike that you use to make gaps in the weave to help thread rods through. If you don’t want to buy a bodkin you can just use screwdriver or a thick knitting needle. But for simple project you likely won’t need one at all.
- A wrapping iron – this is a weighted piece of metal that fits in the palm of your hand. Basket makers use these to ‘wrap’ down the weave to compact it and make it look tidier. If you don’t want to buy one you can use a rolling pin or the handle end of a hammer.
- A weight – any will do, a stone of about 3kg is ideal. Put this in the basket to hold it steady while you work.
- A water spray bottle. Take and old spray bottle wash it out and fill it with water. you will need to spray you basket as you weave to keep the willow moist and workable.
- For larger baskets or square baskets you might need a tape measure to help you maintain the target dimensions as you weave.
That’s all you need!
If you’re thinking about learning to make your first basket you may feel a bit daunted. Where do you get the right materials and information? And are there any good courses available near you that are taking place on the right dates? That’s where our courses and kits come in. Pick a basket from our site that you want to learn to make, and you’ll get lifetime access to a beautifully produced, in-depth online video course, plus all the materials you need will be delivered straight to your door. Our kits are great to do alone, great to do in groups and they also make fantastic creative gifts.
Weaving your first basket
Before you weave your first basket it’s not a bad idea to have a go at a fun and ultra-simple project first. It gives you an opportunity to make a few mistakes and get used to working with the material.

That’s why we are currently offering our Tension Tray Kit as a FREE bonus when you order our Shopping Basket Kit. The tension tray is a lovely first project that will teach you a few basic weaving techniques and generally get you warmed up to make your first basket. Tension trays are great for serving food like cheese or sandwiches. You can also use them as a stand to put hot pans on.
What’s the best type of basket to tackle?
It’s now time to weave your first basket, and one of the most fun parts of the process is deciding which one to make!
Willow baskets come in a variety of shapes and sizes and it’s important to choose the right one as a first project. They can be grouped into four broad groups: round base, D-shaped base, oval base and square base.
Round base baskets are a great place to start and are the foundation skill of basketry. The nice thing about making baskets is once you have mastered a basic round base format, you can go on to make a great variety of things.

The Willow Fruit Basket is a great first project. You can also use it to serve bread or canapes or as a centrepiece for your table. This project will teach you several core techniques including how to make around base, a basic ‘pairing’ weave for the sides and how to make the ‘border’, which is the rim around the basket. This project covers the basics and only takes about 1.5 hours to complete.

If you are looking to learn a wider variety of skills, we recommend weaving a Shopping Basket. These baskets are gorgeous and you will learn all the main skills of basketry: the round base, three types of weave on the sides that each play a different role, the border and also a lovely willow handle lattice handle wrap.
This basket takes a longish afternoon to make, or you can split is up into three sessions which makes it great for fitting in around your other commitments.
To get an idea of what the process is like, check out this FREE video lesson from our Shopping Basket course, which teaches you how to get started making a round basket base:
Once you have mastered the base you will learn how to insert the uprights, which is known in basket weaving as ‘staking up’.

These vertical rods dictate the conical shape of the sides of the basket and it’s important to get them evenly spaced and bending up in a smooth uniform curve. These are then secured together with a tie at the top.

After the uprights you will put on the waling. This strong 3-rod weaving pattern is easy to do and helps reinforce the area where the uprights meet the base. It also forms hardwearing lip around the bottom edge of the basket that helps it deal with being left on the floor etc.

It’s then time to put on the French rand. There are many different patterns of weave that you can put on the side of a basket, but the French rand is one of the prettiest and most accessible. At this point you can choose how high to make your basket as you can either put on one layer or two layers. The process is identical.

Once you have finished sides you put on one more layer of waling which is designed to strengthen and reinforce the rim of the basket. Then it’s time to lay the border.
There are also many types of borders in basket weaving and for the shopping basket you’ll need to learn a so-called four-behind-two rod border. This is a classic that you will have seen on many baskets before. The border is laid in two phases, the initial weaving pattern around the rim, and then ‘weaving away’ the border, which is when you tuck it back into itself at the end to give it a continuous flowing pattern all the way round.

After the border comes the handle, which is the final job and can be done as a separate session. You’ll make a 3-foot-long handle core from one of your thicker rods and insert it into opposite points on the rim to make the basic shape. Then you will wrap the handle with 5 thinner rods to secure it, finishing off with this lovely herringbone weave on the sides. This makes the handle both beautiful and incredibly strong.
If you’d like to learn to weave the shopping basket, take a look at our shopping basket course and kit. All our kits come with a 30 day, no quibble, money back guarantee, so you can try them out risk free. If you’re part of a group, you’ll get an automatic 20% off. Just buy the number of kits you want and then email the participants names and emails to hello@myown2hands.co. We will then get everyone set up with their own account to view the course.